

How To Draw A Pine Cone Easy

Step-by-Step instructions for How-to Make a Pine Cone Wreath.
The vacation period will soon be upon u.s.a., so how near making a pino cone wreath to celebrate the season. A pine cone wreath can be hung on a door, placed flat on a dining room tabular array or cafe as a centerpiece, or used in place of a picture show or mirror over a fireplace during the Wintertime months. Small pino cone wreaths can even exist used every bit decorative candle stick bases. In this postal service y'all'll encounter how really like shooting fish in a barrel it is to make a wreath that you lot will have for years; they besides brand great gifts for friends, relatives and neighbors.  Supplies needed to brand the wreath…
(1) A wire wreath frame (bought at arts and crafts stores everywhere; mine was fourteen inches wide)
(2) New freshly fallen pine cones (not grayed and weathered ones that brutal a previous twelvemonth)
(3) florist wire (I used size 24 GA)
(4) wire cutters
and newspapers or an old cloth to protect your piece of work tabular array Step i… Working close as possible to a cantankerous wire (as seen in the above photo), take your first pino cone and twist information technology in a clock wise direction, pointed side down, in-betwixt the ii center wires that make upward your wreath frame. Afterward inserted, push button the cone side-wards into the cross wire, that will help to ballast it. After that twist in your second pine cone, just as you did the showtime, and and so push it into the first cone you placed on your wreath form. By pushing the cones together, the cone petals will mesh into each other which makes the wreath both structurally and visually solid looking.
 This photo, looking from the side of the wreath, shows how the first iii pine cones have been inserted into the wreath frame.
 The to a higher place photo shows the completed center part of the wreath, looking at the front side.
 This photograph shows the completed dorsum side of the wreath with the pointed ends of the pine cones facing you.
 Step two… Have the stop of your florist wire and lash it to any 1 of the cross wires that brand up your wreath frame. Subsequently that twist the florist wire once round the acme of the pine cone nearest information technology (as seen in the above photo). After wiring your starting time cone, have your wire over to the top of the cone adjacent to it and do the same; continue twisting the florist wire, from one cone to another until you take completed the circle of cones, then twist the wire effectually a cross wire again. By doing this step you have secured all the cones to each other and the wreath grade.
 Stride iii… Working from the dorsum side of your wreath, you volition adjacent be forming the inner circle. First attach your florist wire to the inner wire of your wreath base at a cantankerous wire. Next take your pine cone and push it tightly up against the florist wire and your wreath frame; then lash the cone to the frame.
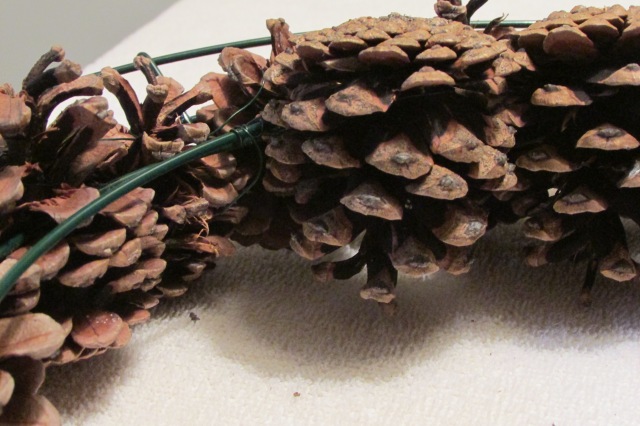 The above photo shows a side view of how the cones are pushed upwardly tightly next to each other and how they are positioned on the wreath frame.
 This is the completed backside of the inner circle.
 The is the completed front side of the inner circle.
 Step four… Working from the backside of the wreath, pino cones are next added to form the outer ring. Start by attaching your florist wire to the outer wire of your wreath frame at a cross wire, and begin attaching your cones.
  The above photo shows the first ii cones that were attached. Discover how they accept been pushed up close to each other, and how their petals are pushed into the wire wreath base of operations.
 The to a higher place photo shows the completed dorsum,
 and this photo shows the completed front.
  Step five … To brand the wreath even more solid, florist wire was run tightly around the outside edge of the wreath between the cones' petals, as shown in the above photo .
 Adjacent some cross support was added to the pine cone wreath in three or four places, which is similar to the cross supports on the wire wreath form. Take your florist wire and adhere it to the back side of your wreath on the frame (yous can see information technology where I'm pointing in the photo). Bring the wire from the outside of your wreath to the front hiding the wire between the petals of the pino cones every bit it goes over the front and again moves to the back of the wreath through its centre; then lash information technology to the back of the wreath frame again. By doing these ii steps the wreath is held tightly together in both directions.
 Stride six… Decorating the Wreath… Supplies needed
(1) a tin of Rust-oleum spray Crystal Clear Enamel (gloss) (optional, but I used information technology)
(two) wired ribbon ( I used 1 1/ii inch thick)
(3) contrasted nuts in their shells ( I used hazelnuts and filberts)
(iv) decorative picks with berries (available at craft stores everywhere)
(five) florist wire and wire cutters
(vi) non shown an electric drill and a v/64 inch drill bit
(A) ..Cut berries from picks (equally seen in the photo) and attach florist wire to them leaving virtually half dozen inches of wire to adhere to wreath.
(B) ..Wearing safety glasses drill a pigsty through the base of each nut. Pass florist wire through holes, and wire every bit berries were done, leaving about six inches of wire to adhere to wreath.
If you are good with a hot glue gun you could perhaps adhere the berries and nuts to the wreath using it, instead of doing the wiring and drilling.
Afterwards attaching the pine cones to the wreath base, no affair how tightly you positioned them, at that place will be spaces, hither and there, between the cones. Take yous nuts and berries and employ them to fill in empty spots. Try to identify things a flake symmetrically when yous lay out your nuts and berries. Before permanently wiring or gluing berries and nuts to the wreath practice a dry run to see what looks best. When yous finally get your berries and nuts where you desire them, laissez passer the florist wire through the wreath to its back side and wire the berries and basics to the tops of the cones that form the centre of your wreath.
Adjacent await at the three photos showing my wreath with no bow, but berries and different kinds of nuts on it. Each one has a different look. Here hazelnuts and berries have been used (the wreath looks kind of rustic and has an Adirondack kind of vibe).
 This is with berries, hazelnuts and filberts (a scrap more colorful with the addition of the lighter filbert shells).
 This is just berries and filberts (the filberts being a low-cal color create a more high contrast paired with the pine cones).
The iii wreaths just shown show the pino cones and basics in their natural colors; I would say a bit more than rustic and bawdy. The adjacent picture shows it later on being varnished with the Rust-oleum Crystal Clear Enamel. The Crystal Articulate brought out all of the deeper-richer colors that the cones and nuts accept, and I recollect protects the wreath a bit; the look is a bit more elegant and Victorian.  If you decide to varnish the wreath spray information technology with the nuts attached. Afterwards varnishing then adhere the berries and bow. Spray information technology first face down, then you can get the dorsum and sides. After that (when it has dried), spray its front end and sides a flake more. When I sprayed mine, I had it suspended up on some old 4×4 inch wooden blocks so it was not touching the cardboard that I put on the flooring of my garage under it.
Step 6… To hang the wreath, take a length of florist wire and double it. Adhere it to the acme of your wreath on the back center and wire it to the wreath'southward wire frame.
Step 7…To make the Bow, as seen on the wreath, read my post Making an Easy No Tie Bow for Your Christmas Wreath
And then in that location you have information technology, instructions on how to make a Pine Cone Christmas Wreath. Years ago, when I did art and arts and crafts fairs, I made many of them and sold them seasonally. Making the wreath brought back happy memories of doing shows and of all the really squeamish/wonderful people who I came beyond during that period of my life.
This, my 161 mail service, marks the v Anniversary of Fred Gonsowski Garden Dwelling house.com. Thank you You to all of the people who have written comments, pinned me on Pinterest, The San Francisco Chronicle, eHOW, and Confront Book. Seeing that my articles on interior decorating and gardening accept been read, so far, over a meg and a one-half times by people world-wide has really been a JOY.
Companion Posts on Fred Gonsowski Garden Home.com
It's EASY to Fluff a Fake / Artificial Christmas Wreath 11-xxx-0211,
Putting Lights on a Christmas Tree..The Piece of cake Way 11-iii-2011,
Christmas Tree Decorating..Step-past-Stride, Like a Pro xi-thirteen-2011,
Cutting/Making Paper Snowflakes 10-27-2011,
A newspaper Craft projection for Kids..Make a Christmas Tree out of Your Name eleven-18-2011,
It's Easy to Make a Tulle Christmas Wreath 11-viii-2012,
How to Decorate a Christmas Tree with Tulle 10-xx-2012.

Source: https://fredgonsowskigardenhome.com/2015/10/29/how-to-make-a-pine-cone-christmas-wreath/
Posted by: guyloctatintoo.blogspot.com
0 Response to "How To Draw A Pine Cone Easy"
Post a Comment